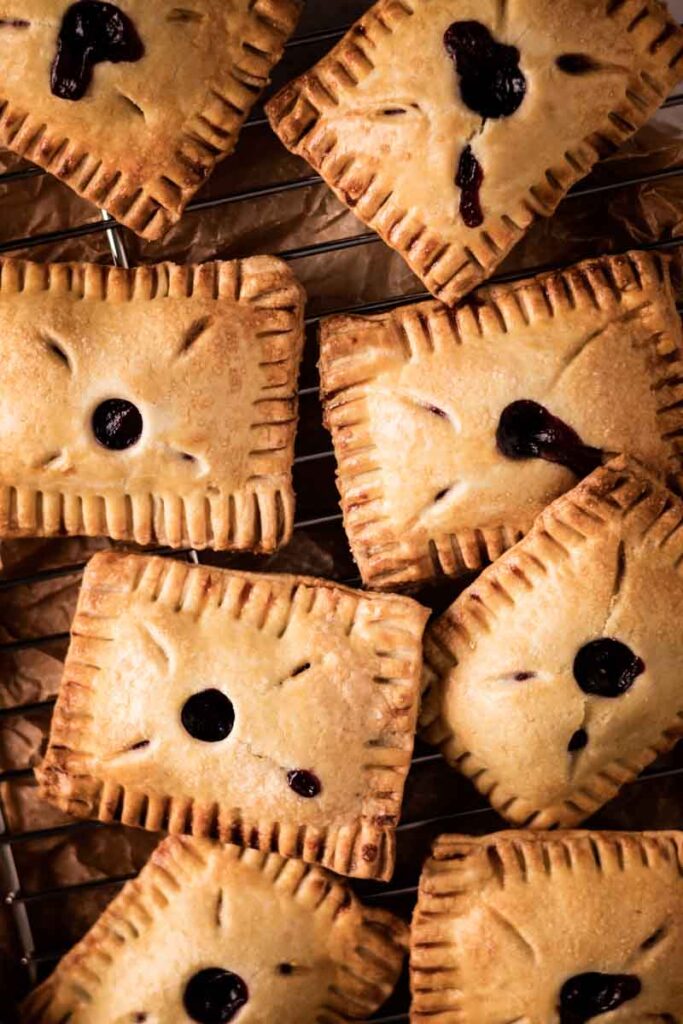
These Cherry Hand Pies are the perfect handheld treat! Sweet, flaky pastries filled with a juicy cherry filling, offering all the flavors of a classic cherry pie, but in a conveniently portable form. With very little effort, you can create these little yummy pockets using store-bought pie dough. So whether you’re baking for a family gathering or just looking for a fun dessert to enjoy, these cherry hand pies are sure to steal the show!

Cherry Hand Pies Recipe
There’s something magical about a warm, juicy cherry filling nestled inside a flaky, buttery crust. Cherry hand pies are the ideal way to enjoy this sweet combination in a convenient, handheld form. They’re perfect for any occasion – from a quick afternoon snack to a show-stopping dessert for a party or picnic. The best part? They come together easily with just a few simple ingredients, making them perfect for bakers of all skill levels. Whether you’re using fresh cherries, frozen ones, or even canned cherry pie filling, you can create a batch of these delicious pies in no time.
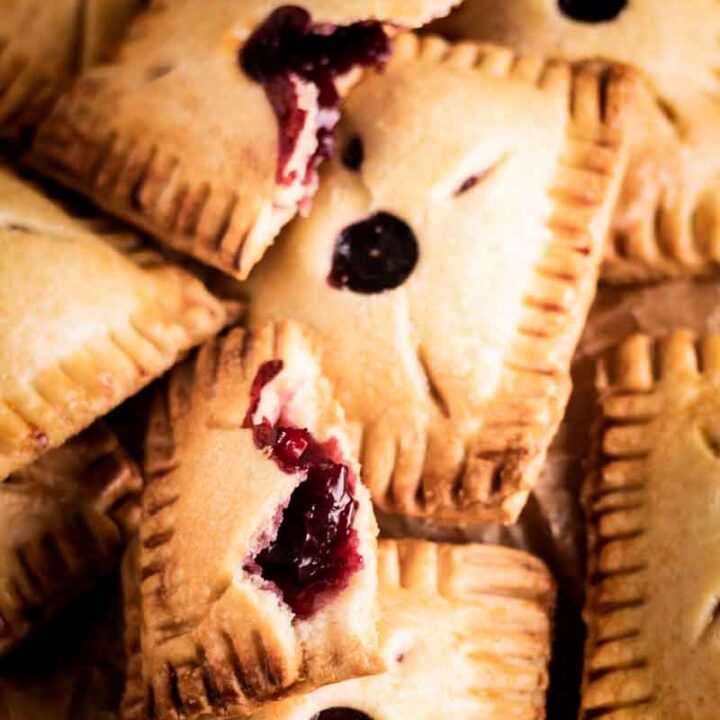
The cherry filling is bright and tangy, balanced by a buttery, golden crust. And with the added hint of almond extract, these pies take on a rich, aromatic flavor that elevates them to the next level.
Why You’ll Love This Recipe
- Fresh or frozen cherries create a vibrant, juicy filling that’s sweet with a touch of tartness.
- Using store-bought pie dough makes this recipe incredibly easy to prepare, cutting down on prep time.
- You can swap fresh cherries for frozen or canned cherry pie filling, depending on what you have on hand.
- The pie dough bakes to a golden, flaky texture that perfectly complements the sweet, gooey cherry filling.
- Adding a little almond extract gives the pies a deliciously subtle nutty flavor that pairs beautifully with cherries.

Ingredients for Cherry Hand Pies
Let’s break down the ingredients needed for perfect mini cherry pies, starting with the filling and then moving on to the crust.
For the filling:
- Cherries (fresh or frozen): Fresh, in-season cherries are ideal for this recipe, but if fresh cherries aren’t available, frozen cherries work just as well. You can even use canned cherry pie filling for convenience, though you may need to adjust the sugar based on its sweetness.
- Granulated sugar: The sugar sweetens the filling and helps it thicken. If using canned cherry pie filling, you may want to reduce the sugar slightly since it’s already sweetened.
- Cornstarch: This acts as a thickening agent for the filling, turning the juicy cherries into a sticky, syrupy consistency that won’t leak out when baked.
- Lemon juice: A dash of lemon juice adds acidity and brightness, balancing the sweetness of the cherries and enhancing their flavor.
- Almond extract (optional): This optional ingredient adds a delicate almond flavor that pairs beautifully with cherries. It’s subtle, but it elevates the overall taste of the hand pies.
For the crust:
- Store-bought pie dough: The easiest option for creating flaky, golden hand pies. You can use any brand of store-bought pie dough, or if you prefer, make your own from scratch.
- Egg wash: A mixture of egg and milk brushed on the dough before baking gives the hand pies a beautiful, golden crust.
- Coarse sugar (optional): Sprinkling coarse sugar on top before baking adds a sweet, crunchy touch to the crust.
How to Make Cherry Hand Pies (Step-by-Step)
- Prepare the filling: Start by pitting and chopping the fresh cherries if you’re using them. In a medium saucepan, combine the cherries, sugar, cornstarch, lemon juice, and almond extract (if using). Stir gently to combine, and cook over medium heat. Stir the mixture frequently, and cook for about 5–7 minutes, or until the cherries begin to break down and the filling thickens. Remove from heat and set aside to cool to room temperature.
- Preheat the oven: Preheat your oven to 375°F (190°C). Line a baking sheet with parchment paper to prevent the hand pies from sticking during baking.
- Roll out the dough: Unroll the pie dough on a lightly floured surface. Using a round cutter or a glass, cut out circles of dough about 4 inches in diameter. You should be able to cut out about 8 circles, depending on the size of your cutter.
- Assemble the hand pies: Place a spoonful of the cooled cherry filling in the center of each dough circle. Be careful not to overfill, as the filling may spill out during baking. Fold the dough in half to form a half-moon shape, then press the edges together gently with your fingers. Use a fork to crimp the edges securely, ensuring the filling stays inside.
- Brush with egg wash: In a small bowl, whisk together the egg and milk. Brush the egg wash over the top of each hand pie to give it a shiny, golden crust once baked.
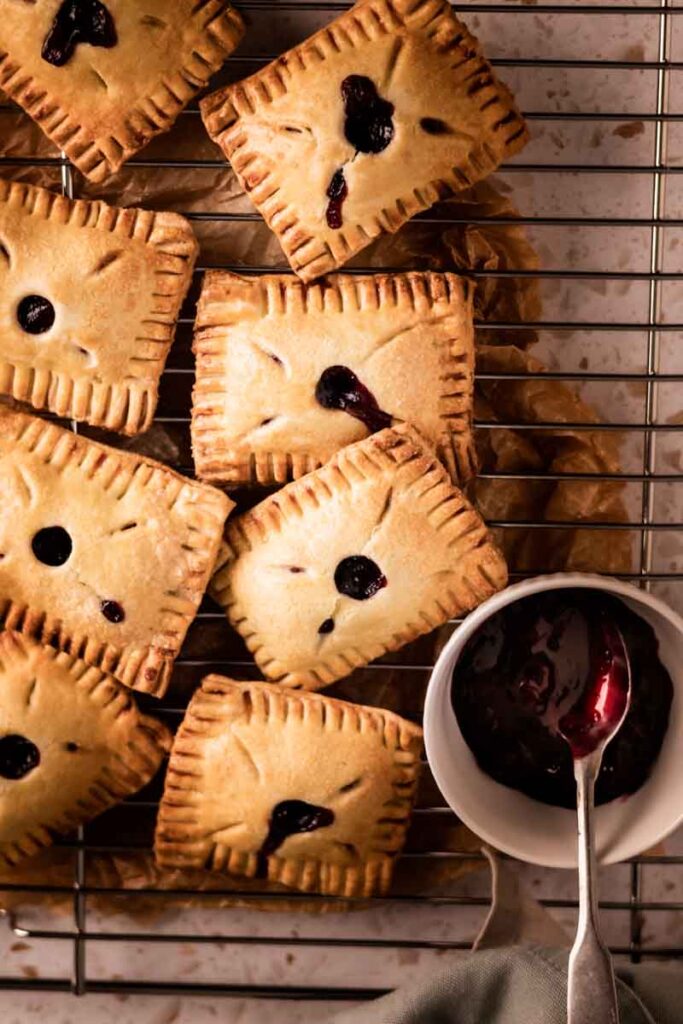
- Bake the hand pies: Place the assembled hand pies on the prepared baking sheet, leaving space between each one. Sprinkle the tops with coarse sugar (optional). Bake for 20 – 25 minutes, or until the pies are golden brown and the filling is bubbling out. Keep an eye on them to make sure they don’t overbrown.
- Cool and serve: Allow the hand pies to cool for a few minutes before serving. They’re best enjoyed warm, but you can also store them for later.
Recipe Notes and Extra Tips:
- How to prevent leaking filling: Make sure to seal the edges of your hand pies well with the fork. If you’re worried about the filling spilling out, you can also add a small cut on top of each pie to allow steam to escape during baking.
- Adjust sweetness: If you use canned cherry pie filling, taste it before adding extra sugar. It might already be sweet enough.
- Chilling the dough: If your store-bought dough feels too soft or sticky to work with, chill it in the refrigerator for 10 – 15 minutes before rolling it out.
- Storage: Cherry hand pies can be stored in an airtight container for up to 3 days. For longer storage, freeze them by wrapping each pie individually and placing them in a freezer-safe bag. To reheat, bake them at 350°F (175°C) for about 10 – 12 minutes or heat in the microwave for 20 – 30 seconds.
Recipe Variations
Mixed Berry Cherry Hand Pies: Mix cherries with raspberries or blackberries for a delicious berry blend.
Chocolate Cherry Hand Pies: Add a few mini chocolate chips to the filling for a decadent twist.
Vegan Hand Pies: Use plant-based butter in the dough and replace the egg wash with a mixture of almond milk and maple syrup for a vegan version.
Lemon Cherry Hand Pies: Add lemon zest to the filling for a fresh, citrusy kick that complements the cherries beautifully.
How to Serve Cherry Hand Pies
These sweet cherry hand pies are perfect for any occasion. Serve them warm for an irresistible dessert, or enjoy them as a sweet snack with a cup of coffee or tea. They also make a fantastic addition to a picnic, potluck, or summer party. If you’re feeling extra indulgent, pair them with a scoop of vanilla ice cream or a dollop of whipped cream. The combination of the sweet cherry filling with a cold treat is sure to be a crowd-pleaser!
How to Store and Reheat
To store your cherry hand pies, place them in an airtight container and refrigerate them for up to 3 days. For longer storage, wrap each pie individually and freeze them in a freezer-safe bag. To reheat, place the pies in a preheated oven at 350°F (175°C) for about 10 – 12 minutes, or until the crust is warm and crispy. Alternatively, reheat them in the microwave for 20–30 seconds if you’re in a rush. Either way, you’ll enjoy a warm, flaky hand pie with a sweet, juicy filling.

FAQ About Cherry Hand Pies
Yes, frozen cherries work perfectly for this recipe! Just make sure to thaw and drain them before using them to avoid excess moisture in the filling.
Yes, canned cherry pie filling is a great shortcut. However, it may be sweeter than fresh cherries, so adjust the amount of sugar accordingly.
Absolutely! You can freeze the assembled hand pies before baking. Just place them on a baking sheet and freeze them until solid, then transfer them to a freezer-safe bag. Bake them from frozen at 375°F (190°C) for 25 – 30 minutes.
Yes, you can prepare the pies ahead of time and store them in the fridge or freezer until you’re ready to bake them.
Cherry Hand Pies
These Cherry Hand Pies are the perfect handheld treat! Sweet, flaky pastries filled with a juicy cherry filling, offering all the flavors of a classic cherry pie, but in a conveniently portable form.
Ingredients
- 1 ½ cups fresh or frozen cherries (pitted)
- ⅓ cup granulated sugar
- 1 tablespoon cornstarch
- 1 teaspoon lemon juice
- ½ teaspoon almond extract (optional, but adds a lovely flavor)
- 1 package of store-bought pie dough
- 1 egg, beaten (for egg wash)
- 1 tablespoon milk (for egg wash)
- Coarse sugar, for sprinkling (optional)
Instructions
- Combine cherries, sugar, cornstarch, and lemon juice in a medium saucepan over medium heat.
- Cook while stirring until the cherries release their juices and the mixture thickens (about 7–10 minutes).
- Stir in almond extract if using, and let the filling cool completely.
- Roll out the pie dough on a lightly floured surface. Cut into equal circles (4 - 5 inches in diameter) or equal rectangles (4x6 inches).
- Place a spoonful of the cooled cherry filling in the center of each piece of dough.
- Cut small slits on the covering crust to allow steam to escape or use the ends of a large straw to create a circle vent on top.
- Fold the dough over the filling to create a semicircle or rectangle. Press the edges with a fork to seal tightly.
- Arrange the pies on a parchment-lined baking sheet and refrigerate for 15 - 20 minutes to firm up.
- Preheat your oven to 375°F (190°C).
- Mix the beaten egg with milk to make an egg wash. Brush over the tops of the pies and sprinkle with coarse sugar for crunch.
- Bake for 20 - 25 minutes, or until golden brown.
- Cool the pies on a wire rack for a few minutes. Serve warm or at room temperature.
Notes
- Make sure to seal the edges of your hand pies well with the fork. If you’re worried about the filling spilling out, you can also add a small cut on top of each pie to allow steam to escape during baking
- If you use canned cherry pie filling, taste it before adding extra sugar. It might already be sweet enough.
- If your store-bought dough feels too soft or sticky to work with, chill it in the refrigerator for 10 - 15 minutes before rolling it out.
- Cherry hand pies can be stored in an airtight container for up to 3 days. For longer storage, freeze them by wrapping each pie individually and placing them in a freezer-safe bag. To reheat, bake them at 350°F (175°C) for about 10 - 12 minutes or heat in the microwave for 20 - 30 seconds.
Nutrition Information:
Yield: 8 Serving Size: 2Amount Per Serving: Calories: 189Total Fat: 8gSaturated Fat: 3gTrans Fat: 0gUnsaturated Fat: 4gCholesterol: 23mgSodium: 128mgCarbohydrates: 28gFiber: 1gSugar: 12gProtein: 2g
Nutritional information is provided as a courtesy only and should be construed as an estimate rather than a guarantee. Ingredients can vary and Kitchen On The Avenue makes no guarantees to the accuracy of this information.
Leave a Reply